How to take screenshot in laptop – We’ve all been there. You finally beat that tricky level in a game, a hilarious meme pops up in a video call, or you need to save an important online receipt. The immediate thought is, “I need to take a screenshot of this!” But if you’re fumbling with random key combinations, you might miss the moment.
Fear not! Taking a screenshot on your laptop is simpler than you think. This comprehensive guide will walk you through every method for both Windows and macOS, ensuring you can capture your screen perfectly, every single time.
First, A Quick Question: Windows or Mac?
The method you use depends entirely on your laptop’s operating system. The first step is to know which one you’re using. The rest is easy!
How to Take a Screenshot on a Windows Laptop
Windows offers several built-in tools, from quick full-screen captures to powerful snipping tools. Let’s explore them from the simplest to the most advanced.
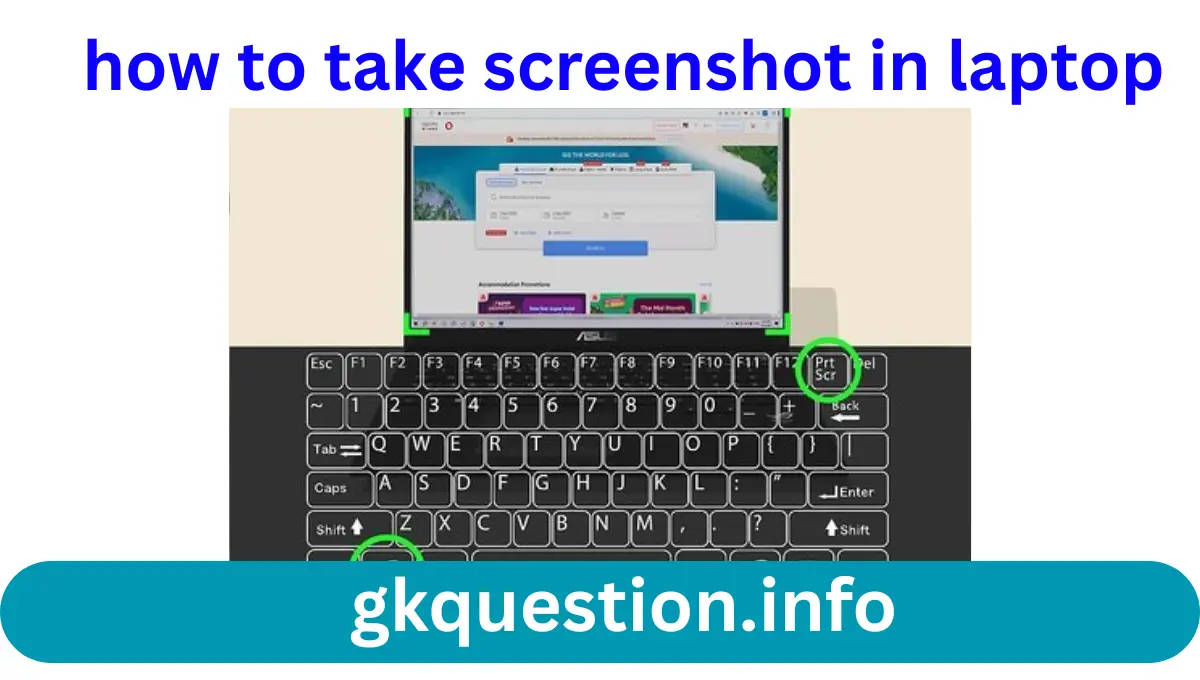
Method 1: The Print Screen (PrtScn) Key – The Classic
This is the oldest trick in the book. Look for a key labeled PrtScn, PrtSc, or Print Screen, usually located in the top-right row of your keyboard.
- Capture the Entire Screen: Simply press the
PrtScnkey. This copies a picture of everything on your screen(s) to your clipboard. It doesn’t save a file automatically. To view it, you need to open an app like Microsoft Paint, Word, or even your email, and pressCtrl + Vto paste it. - Capture Only the Active Window: Found something important in a specific program? Click on the window to make it “active,” then press
Alt + PrtScn. This copies only that window to your clipboard, which you can then paste elsewhere. - Instantly Save a Full Screenshot: Want to save a screenshot directly as a file without pasting? Press the
Windows Key + PrtScn. Your screen will dim for a moment, and the screenshot will be automatically saved in thePictures > Screenshotsfolder on your laptop.
Method 2: Snipping Tool & Snip & Sketch – The Modern Favorites
For more control, Windows offers the Snipping Tool (and its newer version, Snip & Sketch, which is now merged into the Snipping Tool in Windows 11).
- Press the
Windows Key + Shift + S. Your screen will dim, and a small toolbar will appear at the top. - Choose your snip type:
- Rectangular Snip (Default): Drag your cursor to create a rectangle around the area you want.
- Freeform Snip: Draw any shape with your cursor—perfect for irregular selections.
- Window Snip: Click on any open window to capture it.
- Fullscreen Snip: Captures your entire screen.
- Once you snip, a notification will pop up. Click on it to open the screenshot in the Snipping Tool app, where you can annotate, crop, or save it.
Method 3: The Game Bar – For Gamers and Beyond
Designed for gamers, the Game Bar is excellent for capturing gameplay but works for any app.
- Press the
Windows Key + Gto open the Game Bar overlay. - Click the camera icon (or press
Windows Key + Alt + PrtScn) to take a full-screen screenshot. - You can also record your screen by clicking the record button.
- Your captures are automatically saved in the
Videos > Capturesfolder.
How to Take a Screenshot on a MacBook
Apple laptops, running macOS, have their own elegant set of keyboard shortcuts that are incredibly powerful and intuitive.
Method 1: Basic Keyboard Shortcuts
These are the go-to commands for most Mac users.
- Capture the Entire Screen: Press
Shift + Command (⌘) + 3. The screenshot will be saved as a file directly on your desktop. - Capture a Selected Portion: This is the most useful one! Press
Shift + Command (⌘) + 4. Your cursor will turn into a crosshair. Click and drag to select the exact area you want to capture. Release the mouse button to take the shot. To cancel, just press theEsckey before releasing. - Capture a Specific Window: Press
Shift + Command (⌘) + 4, then press theSpacebar. The crosshair will turn into a little camera icon. Move this camera over any window (it will highlight in blue) and click to capture just that window, including its shadow for a nice aesthetic.
Method 2: Using the Screenshot Toolbar (macOS Mojave & Later)
For a centralized hub with more options, use the Screenshot app.
- Press
Shift + Command (⌘) + 5. A control toolbar will appear at the bottom of your screen. - Here, you can choose to:
- Capture the entire screen, a selected portion, or a specific window.
- Record your entire screen or a selected portion (video).
- Click “Options” to set a timer, choose a save location, and decide whether to show or hide the mouse pointer.
Pro Tips for Perfect Screenshots
No matter which laptop you use, these tips will make you a screenshot pro.
- Find Your Files: On Windows, check the
Pictures > Screenshotsfolder. On a Mac, look on your Desktop by default. You can change this location in the settings (especially via theOptionsmenu in the Mac Screenshot Toolbar). - Use the Clipboard: If you don’t want to clutter your folders, use the methods that copy to the clipboard (
PrtScnon Windows, and addCtrlto any Mac shortcut, e.g.,Ctrl + Shift + Command + 4). Then, you can paste it directly into a chat, document, or email. - Edit Immediately: Both Windows Snipping Tool and the Mac’s preview allow you to mark up your screenshots right after taking them. Highlight text, draw arrows, or blur sensitive info before sharing.
Conclusion
And there you have it! From the simple PrtScn key to the precise snipping tools on Windows, and from the elegant shortcuts to the powerful toolbar on a Mac, you’re now equipped to capture anything on your screen with confidence.
The next time you see something you need to save or share, don’t just stare at it—grab it! Happy screenshotting